[2023-03-31] 3. RVIZ 오도메트리 활용
Odometry 오도메트리
-
오도미터 등의 기기의 측정값으로 움직이는 사물의 위치를 측정하는 방법
-
Odometer 오도미터
- 차량이나 로봇이 주행하며 이동한 거리를 측정한 거리
자동차 핸들과 앞 바퀴
- 앞 바퀴 2개의 회전시 꺾이는 각도가 다름
- 안쪽과 바깥쪽 회전 원의 중심이 일치해야 함

- Ackerman Steering(애커만 조향)

자동차의 위치 정보
\[현재\;위치 : (x,y) 좌표 + \Theta \\ 이동\;속도 : v + \omega \\ 조향각 : \delta\]
RVIZ 기반 오도메트리 활용
-
Odometry 토픽
- /odom
-
메시지 타입 : nav_msgs/Odometry
$ rosmsg show nav_msgs/Odometry
-
odom_publisher_ex.py 작성
std_msgs/Header header
    uint32 seq
    time stamp
    string frame_id
string child_frame_id
geometry_msgs/PoseWithCovariance pose
    geometry_msgs/Pose pose
        geometry_msgs/Point position # 물체의 3차원에서 x,y,z의 좌표
            float64 x
            float64 y
            float64 z
        geometry_msgs/Quaternion orientation # 롤,요,피치 대신 표현한 값(오일러 좌표계를 대신할 쿼터니언 좌표계)
            float64 x
            float64 y
            float64 z
            float64 w
    float64[36] covariance
geometry_msgs/TwistWithCovariance twist
    geometry_msgs/Twist twist
        geometry_msgs/Vector3 linear # 선 속도
            float64 x
            float64 y
            float64 z
        geometry_msgs/Vector3 angular # 각 속도
            float64 x
            float64 y
            float64 z
    float64[36] covariance
-
odometry_publisher_ex.py
- odometry_publisher 노드를 생성하고 거기서 /odom 토픽을 1초에 한번씩 발행
X축, Y축, 이동 속도 벡터 계산
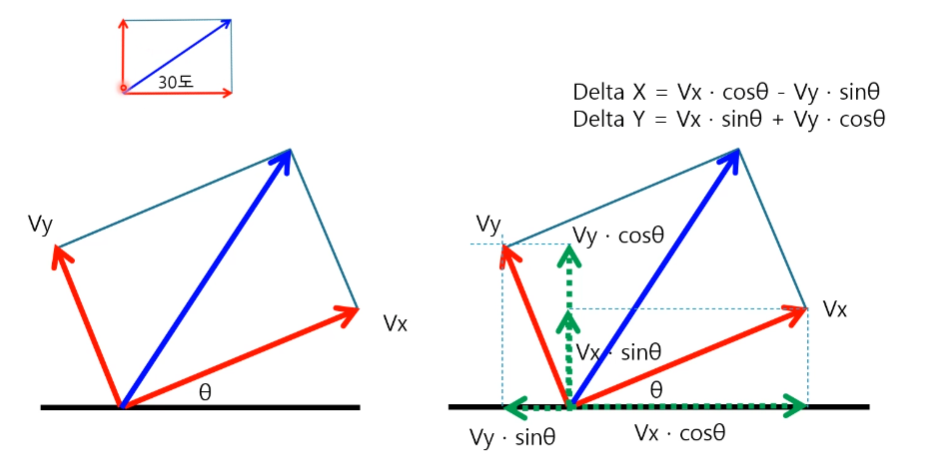
- 이동 속도 Vx, Vy
- Vx, Vy 값은 동일하게 초당 10cm
- 세타 각도 값은 0.1 라디안(5.7도)씩 꺾임

토픽 발행 파이썬 코드 odom_publisher_ex.py
- odom_publisher_ex.py 작성
#!/usr/bin/env python

import math
from math import sin, cos, pi

import rospy
import tf
from nav_msgs.msg import Odometry
from geometry_msgs.msg import Point, Pose, Quaternion, Twist, Vector3

# 노드 생성
rospy.init_node('odometry_publisher')

# 토픽 발행
odom_pub = rospy.Publisher("odom", Odometry, queue_size=50)
odom_broadcaster = tf.TransformBroadcaster()

# 초기 위치(0, 0, 0)
x = 0.0
y = 0.0
th = 0.0

# x축 속도 10cm/s, y축 속도 -10cm/s, 주행 방향 0.1라디안 (5.7도)
vx = 0.1
vy = -0.1
vth = 0.1

# 시간 정보 계산용 변수
current_time = rospy.Time.now()
last_time = rospy.Time.now()

# 1초에 한번씩 루프 돌기
r = rospy.Rate(1.0)

while not rospy.is_shutdown():
    current_time = rospy.Time.now()

    # compute odometry in a typical way given the velocities of the robot
    dt = (current_time - last_time).to_sec()
    delta_x = (vx * cos(th) - vy * sin(th)) * dt
    delta_y = (vx * sin(th) + vy * cos(th)) * dt
    delta_th = vth * dt

    x += delta_x
    y += delta_y
    th += delta_th

    # 오일러 값에서 쿼터니언 값을 계산해 냄
    # since all odometry is 6DOF we'll need a quaternion created from yaw
    odom_quat = tf.transformations.quaternion_from_euler(0, 0, th)

	# 위치정보(자세정보)자에 대한 발행을 준비한다.
    # odom과 base_link를 연결하는 효과
    # first, we'll publish the transform over tf
    odom_broadcaster.sendTransform(
        (x, y, 0.),
        odom_quat,
        current_time,
        "base_link",
        "odom"
    )

    # Odometry 메시지의 헤더 만들기
    # next, we'll publish the odometry message over ROS
    odom = Odometry()
    odom.header.stamp = current_time
    odom.header.frame_id = "odom"

    # Position 값 채우기
    # set the position
    odom.pose.pose = Pose(Point(x, y, 0.), Quaternion(*odom_quat))

    # 속도값 채우기
    # set the velocity
    odom.child_frame_id = "base_link"
    odom.twist.twist = Twist(Vector3(vx, vy, 0), Vector3(0, 0, vth))

    # /odom 토픽 발행하기
    # publish the message
    odom_pub.publish(odom)

	# 잠깐 쉬웠다가 루프 처음으로 되돌아감
    last_time = current_time
    r.sleep()
$ chmod +x odom_publisher_ex.py$ roscore$ rosrun ex_urdf odom_publisher_ex.py$ rostopic list$ rostopic info odom-
$ rqt_graph $ rosmsg show nav_msgs/Odometry-
$ rostopic echo odom $ rostopic list$ rostopic info odom$ rostopic show nav_msgs/Odometry$ rqt_graph

$ rostopic echo odom

RVIZ 가상공간에서 물체 이동시키기
- 기존 ex_urdf 패키지를 이용

- odom_pub.launch 작성
<launch>
    <arg name="model" />

    <param name="robot_description" textfile="$(find ex_urdf)/urdf/pan_tilt.urdf" />

    <!-- Setting gui parameter to true for display joint slider -->
    <param name="use_gui" value="true"/>
    <!-- Starting Joint state publisher node which will publish the joint values -->
    <node name="joint_state_publisher" pkg="joint_state_publisher" type="joint_state_publisher" />
    <!-- Starting robot state publish which will publish tf -->
    <node name="robot_state_publisher" pkg="robot_state_publisher" type="state_publisher" />
    <!-- Launch visualization in rviz -->
    <node name="rviz" pkg="rviz" type="rviz" args="-d $(find ex_urdf)/urdf.rviz" required="True" />

    <node name="odom_publisher" pkg="ex_urdf" type="odom_publisher_ex.py" />

</launch>
- 실행결과
